Daikin error codes: the full list for Australian models
Every Daikin split sold in Australia stores a two-character fault code that you read from the remote by holding the timer CANCEL button for about five seconds. The first letter tells you which half of the system raised it — A and C indoor, E to P outdoor, U system-wide. The table below lists 45 codes with their Daikin meaning and what an owner can do.
Safety first: in Australia, anything involving refrigerant needs an ARC-licensed technician, and anything behind an electrical cover needs a licensed electrician. Everything on this page is limited to checks you can do from outside the unit with the power off at the switchboard. Reading a code and resetting at the breaker are owner jobs; everything under a cover, and anything to do with refrigerant, is licensed work.
How to read the code on a Daikin remote
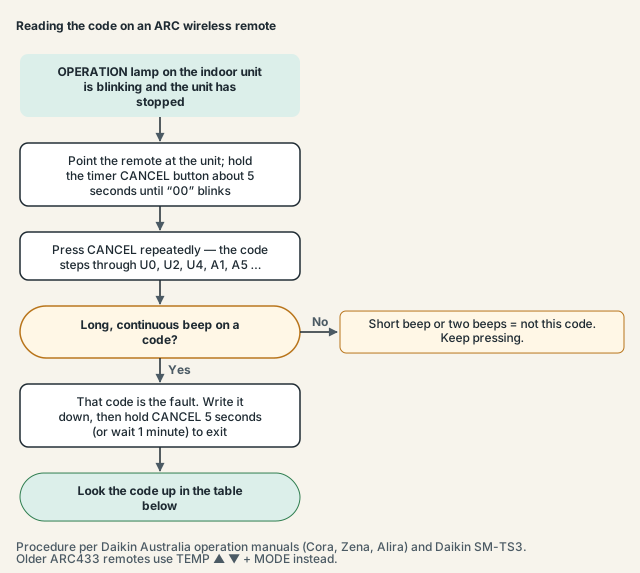
Point the remote at the indoor unit and hold the timer CANCEL button for about five seconds until 00 blinks in the temperature display. Press CANCEL repeatedly to step through the code list. A short beep or two short beeps means "not this one"; a long, continuous beep means the code on the display is the fault the unit has stored.
That is the procedure in the Cora, Alira X and Zena operation manuals and in Daikin's SM-TS3 guide, which lists it for the ARC417A, ARC423A, ARC433B, ARC447A, ARC452A and ARC455A remotes. The codes cycle in a fixed order — 00, U0, U2, U4, A1, A5 and onward — so write the code down when you hear the long beep. To exit, hold CANCEL for about five seconds again, or wait: the display cancels itself after one minute.
Older ARC433B67, B68, B69 and B76 remotes have no CANCEL-based check. On those, press TEMP up, TEMP down and MODE together; the tens digit blinks. Press TEMP to change it: one short beep means the tens digit is wrong, two short beeps means tens right and ones wrong, one long beep means both match. MODE moves to the ones digit and exits; ON/OFF twice returns to normal. The display auto-cancels after 60 seconds.
Ducted systems use the BRC1E wired controller instead. When a fault is detected the screen shows "Error: Push Menu button" and the operation lamp blinks; pressing Menu shows the code with the indoor and outdoor model names and dealer contact. "Warning: Push Menu button" without a blinking lamp is a lesser alert. On the older BRC1C62, the INSPECTION/TEST button enters inspection mode. Daikin does not publish a blink-count table for its wall splits; the lamp simply blinks and the remote is the only way to read the code. Daikin's global Error Code Search is the manufacturer's own lookup; Daikin Australia's site has no equivalent page.
Daikin error code list
The table combines the fault-diagnosis tables in Daikin Australia's Cora, Zena and Alira X operation manuals with Daikin's cross-range SM-TS3 chart and the ESIE16-02B service manual, using the Australian manual wording where a code appears there. The owner-action column is the most you should do from outside the unit before calling; codes marked ducted/cassette rarely appear on wall splits.
| Code | Unit | Meaning | Owner action |
|---|---|---|---|
00 |
— | Normal — no fault stored | None needed |
A1 |
Indoor | Indoor unit PCB abnormality | Reset at breaker, then call if it returns |
A3 |
Indoor | Drain level control system abnormality (drain pump / float switch) — mainly ducted/cassette | Call technician |
A5 |
Indoor | High pressure control or freeze-up protector (freeze-up in cooling / heating peak-cut) | Clean filters / clear airflow, reset |
A6 |
Indoor | Indoor DC fan motor fault | Reset at breaker, then call if it returns |
A7 |
Indoor | Swing flap (louvre) motor malfunction — mainly ducted/cassette | Call technician |
A9 |
Indoor | Electronic expansion valve malfunction — mainly ducted/cassette | Call technician |
C4 |
Indoor | Faulty indoor heat-exchanger temperature sensor | Call technician |
C5 |
Indoor | Gas pipe thermistor malfunction — mainly ducted/cassette | Call technician |
C7 |
Indoor | Front panel open/close fault (Zena self-opening panel) | Clear anything blocking the panel, reset, then call if it returns |
C9 |
Indoor | Faulty suction (room) air temperature sensor | Call technician |
CC |
Indoor | Faulty humidity sensor | Call technician |
CJ |
Indoor | Remote controller room-temperature thermistor abnormality — mainly ducted/cassette | Call technician |
E1 |
Outdoor | Outdoor unit PCB abnormality | Reset at breaker, then call if it returns |
E3 |
Outdoor | Actuation of high pressure switch — mainly ducted/cassette | Clear outdoor airflow, reset, then call if it returns |
E4 |
Outdoor | Actuation of low pressure switch — mainly ducted/cassette | Call technician |
E5 |
Outdoor | Compressor overload (OL activation) | Reset at breaker, then call if it returns |
E6 |
Outdoor | Faulty compressor start-up / compressor lock | Call technician |
E7 |
Outdoor | DC fan motor fault / DC fan lock | Look through grille for obstruction, reset, then call if it returns |
E8 |
Outdoor | Overcurrent input (compressor overcurrent) | Reset at breaker, then call if it returns |
EA |
Outdoor | Cooling–heating switching error (four-way valve) | Call technician |
F3 |
Outdoor | High temperature discharge pipe control | Clear outdoor airflow, reset, then call if it returns |
F6 |
Outdoor | High pressure control in cooling / refrigerant overcharge | Clear outdoor airflow, reset, then call if it returns |
F8 |
Outdoor | Operation halt due to compressor internal temperature | Call technician |
H0 |
Outdoor | Compressor system sensor fault | Call technician |
H6 |
Outdoor | Faulty compressor position detection sensor | Call technician |
H8 |
Outdoor | DC current / voltage sensor fault | Call technician |
H9 |
Outdoor | Faulty outdoor suction air temperature sensor | Call technician |
J3 |
Outdoor | Faulty discharge pipe temperature sensor | Call technician |
J5 |
Outdoor | Suction pipe thermistor abnormality | Call technician |
J6 |
Outdoor | Faulty outdoor heat-exchanger temperature sensor | Call technician |
J8 |
Outdoor | Faulty liquid pipe temperature sensor | Call technician |
L1 |
Outdoor | Outdoor main / inverter PCB abnormality — mainly ducted/cassette | Call technician |
L3 |
Outdoor | Electrical parts heat fault (switch-box temperature rise) | Clear outdoor airflow, reset, then call if it returns |
L4 |
Outdoor | High temperature at inverter heatsink (radiation fin) | Clear outdoor airflow, reset, then call if it returns |
L5 |
Outdoor | Output overcurrent (inverter instantaneous overcurrent) | Reset at breaker, then call if it returns |
P4 |
Outdoor | Faulty inverter heatsink temperature sensor | Call technician |
U0 |
System | Refrigerant shortage | Call technician (ARC-licensed) |
U2 |
System | Voltage drop or main circuit overvoltage (power supply abnormality) | Check power supply / electrician |
U4 |
System | Failure of transmission between indoor and outdoor unit | Reset at breaker, then call if it returns |
U5 |
System | Transmission malfunction between indoor unit and wired remote controller — mainly ducted/cassette | Reset at breaker, then call if it returns |
U7 |
System | Transmission abnormality outdoor unit to outdoor unit (multi) | Reset at breaker, then call if it returns |
UA |
System | Indoor–outdoor unit combination fault | Call technician |
UF |
System | Wiring and piping mismatch (multi) / system not set | Call technician |
UH |
System | Anti-icing in another room (multi) / system malfunction | Wait for other rooms to finish, reset, then call if it returns |
The nine codes marked ducted/cassette — A3, A7, A9, C5, CJ, E3, E4, L1 and U5 — come from Daikin's cross-range chart, not the Australian wall-split manuals, and belong to equipment with drain pumps, expansion valves and pressure switches.
Indoor unit codes (A and C group)
Codes starting with A are indoor-unit component or control faults; codes starting with C are indoor sensors. They show on the unit that raised them, so on a multi-split the other rooms may keep running. Only one, A5, is regularly fixed by the owner; the rest are boards, motors and thermistors behind the front cover.
A1 is the indoor PCB and A6 the indoor DC fan motor. A5 is the protective stop for a coil that has frozen in cooling or overheated in heating; Daikin's cause list starts with a clogged filter, which is why the A5 page is mostly about cleaning. C7 applies to the Zena's self-opening front panel.
The C sensor codes — C4 coil thermistor, C9 room-air thermistor, CC humidity sensor — are inexpensive parts behind the front cover. A unit that alternates A5 and C4 almost certainly has a failing coil thermistor rather than a filter problem.
Outdoor unit codes (E, F, H, J, L and P groups)
Outdoor codes cover the compressor, the outdoor fan, the inverter board and the sensors around them. Daikin splits them into families by first letter: E for the outdoor PCB, compressor and fan, F for protective pressure and temperature controls, H and J for sensors, L for the inverter, and P for the inverter's own thermistor.
The E group is where most outdoor calls land. E1 is the outdoor PCB; E5 is compressor overload and E6 a compressor that fails to start, both technician diagnoses. E7 is the outdoor DC fan motor, which Daikin gives about 15 to 30 seconds to start turning before the code latches. E8 is compressor overcurrent and EA the four-way valve.
The F and L codes are protections rather than failures. F3 (discharge-pipe temperature), F6 (high pressure in cooling), L3 (switch-box temperature) and L4 (inverter heatsink temperature) all mean the outdoor unit could not shed heat. A hedge over the unit, a blocked grille or a 40 °C afternoon can trigger any of them; clearing airflow and resetting is a fair first step. H, J and P are sensor faults — technician job, no owner action beyond noting the code.
System codes (U group)
The U codes describe the system as a whole — the refrigerant charge, the incoming power, the communication between the two units and the pairing of indoor and outdoor models. They tend to appear after something happened to the house rather than to the air conditioner: a storm, a blackout, an electrician's visit, a new solar installation.
U0 is refrigerant shortage: refrigerant is ARC-licensed work in Australia and a low charge means a leak that has to be found. U2 is a voltage drop or main-circuit overvoltage; if it recurs, the supply or the circuit needs an electrician rather than an air conditioning technician. U4 is the indoor–outdoor transmission failure, and the reset Daikin gives for it is a power reset at the outdoor unit — in practice, the breaker.
UA means the indoor and outdoor units are not a valid combination — an installation or replacement-part problem. U7, UF and UH are multi-split codes: outdoor-board communication, a wiring-to-piping mismatch between rooms, and anti-icing running in another room, which clears by itself.
Codes that look like faults but aren't
Not every blink or number on a Daikin is an error. The CANCEL-button check always starts by showing 00, and if 00 gets the long beep, nothing is stored — the blinking you saw was something else. The manuals list normal behaviours that owners mistake for faults, and multi-split quirks that look alarming.
On the Zena, the multi-monitor lamp turns orange for about five seconds periodically when a timer is set; that is the timer indication, not a fault — a fault is the lamp blinking. On a multi-split, an indoor unit that will not start while another room runs the opposite mode is in standby, not in error; one mode runs across all heads. UH, anti-icing in another room, is similar and clears on its own.
A code that shows once after a blackout, clears on reset and never returns is protection doing its job; repetition is what matters. The remote symbols page covers the icons — timer, quiet, powerful, econo — that get mistaken for error indications.
What to do before you call a technician
Most Daikin calls in Australia end with one of four outcomes: a reset that holds, a filter clean, a part behind a cover, or a refrigerant leak. The first two cost nothing; the last two cannot be done by an owner. Five minutes with this list tells you which you are dealing with and gives the technician the details they will ask for.
- Read the code with the remote, not from memory of what the lamp did. Write it down with the date and time.
- Note the model numbers from the stickers on the indoor and outdoor units.
- Reset at the switchboard — breaker off, outdoor isolator off if there is one, a few minutes, back on, restart from the remote. Daikin gives no wait time.
- Check the two things owners can fix: filters and airflow indoors for
A5, clearance and debris at the outdoor grille forE7,F3,F6,L3andL4. - Check for the "call immediately" signs Daikin lists: a burning smell, water leaking from the indoor unit, a breaker or fuse tripping repeatedly, a damaged power cord, abnormal noise. Switch off at the breaker and do not reset.
- Watch what the code does after reset. Gone for a week is a glitch; back within a day is a fault.
- Ring with the code, the model numbers and the story — storm, blackout, recent works.
Daikin Australia's manuals say not to repair, dismantle or modify the unit yourself, and every diagnosis step past this list involves a cover coming off.
Frequently asked questions
How do I check the error code on a Daikin air conditioner?
Hold the timer CANCEL button on the remote for about five seconds until 00 blinks, then press CANCEL repeatedly. Short beeps mean the code shown is not the fault; a long continuous beep means it is. Hold CANCEL five seconds or wait a minute to exit. Ducted systems show "Error: Push Menu button" on the wired controller instead.
Does Daikin Australia publish an error code list?
Not as a web page. Daikin Australia's site has FAQs on controllers and maintenance but no error-code page; the codes are printed in the "Fault diagnosis by remote controller" table at the back of each operation manual on daikin.com.au. Daikin's global site has an Error Code Search tool that covers the same codes.
Why does my Daikin light blink but the remote shows 00?
00 with a long beep means no fault is stored, so the blinking was not an error. On the Zena, the lamp turning orange briefly is the timer indication. On a multi-split, a head waiting for another room to finish is in standby. If the unit still will not run, repeat the check — the long beep is easy to miss.
How much does a Daikin technician cost in Australia?
Daikin does not publish call-out or repair fees, and its warranty page refers to the warranty card. Australian repair-cost guides put a routine service between roughly $75 and $200 and technician labour at $80–$110 per hour plus GST; those are service-company figures, not Daikin's, and vary by state and warranty status.
Sources and manuals checked
Code meanings are from the fault-diagnosis tables in Daikin Australia's Cora, Zena and Alira X operation manuals, with Daikin's SM-TS3 chart and ESIE16-02B service manual filling codes those manuals omit. Daikin Australia's Cora FTX(K)M-QVMA manual could not be opened during checking. No Daikin-published fees exist; cost figures are from Australian service-company guides.
- Daikin Australia — Cora FTXV20–71WVMA Operation Manual, 3P651499-4 (Fault diagnosis by remote controller) (official)
- Daikin Australia — Zena FTXJ25/35/50PVMA Operation Manual, 3P369488-1 (official)
- Daikin — FTXM50WVMA (Alira X) Operation Manual, fault diagnosis table (p. 47) (official)
- Daikin — Self-Diagnosis by Remote Controller (SM-TS3, pp. 7–8) (official)
- Daikin — Simple Self-Diagnosis by Malfunction Code (SM-TS3 code chart) (official)
- Daikin — RA R32 Split & Multi M-Series Service Manual ESIE16-02B, Part 2 Troubleshooting (code index, p. 20) (official)
- Daikin — BRC1E63 Wired Remote Controller Operation Manual, 4P457312-1C (official)
- Daikin Global — Error Code Search (official)
- Daikin Australia — FAQ: What do the symbols on my controller mean? (official)