Mitsubishi air conditioner symbols explained
A Mitsubishi Electric MSZ remote shows a mode icon (AUTO, COOL, DRY, HEAT or FAN), a fan-speed bar graph, a vane-position graphic, the clock and any timers, plus small marks for i-save, ECONO COOL, the pairing number and a low battery. The names below are quoted from Mitsubishi Electric Australia's operating instructions for the AP, GE, EF and LN series.
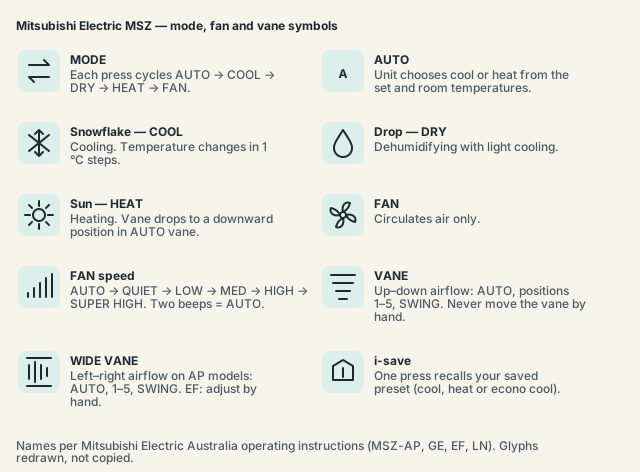
What the MSZ remote display shows
The manuals call the LCD the "operation display section". It shows the mode symbol, set temperature, fan-speed level, vertical vane position (and the horizontal one on AP and LN), ON and OFF timer marks, clock and day, weekly-timer day indicators, the remote controller number 1–4 and a battery replacement indicator.
A word on the pictures. Mitsubishi Electric Australia's symbols page presents the mode icons as an image and says "if the MODE symbols look different on your remote from those above, please consult the user manual for your specific air conditioning model". The manuals likewise print icons as graphics. So the names here — AUTO, COOL, DRY, HEAT, FAN, VANE, WIDE VANE, i-save, ECONO COOL and the rest — are verified from the manuals' text, while the shapes in the figures (snowflake for COOL, sun for HEAT, drop for DRY) are drawn as they appear on the handset.
MODE and the five modes
The MODE button, officially the "operation select button", cycles in a fixed order: "each press changes mode in the following order: (Auto) (Cool) (Dry) (Heat) (Fan)". The display shows one mode symbol at a time. The GE VAD manual lists COOL, DRY, HEAT and AUTO, so FAN on that older series could not be confirmed.
| Symbol | Name | What it does |
|---|---|---|
A or arrows |
AUTO | The unit chooses cooling or heating from the set temperature and the room temperature |
| Snowflake | COOL | Cooling; the temperature buttons move 1 °C per press |
| Water drop | DRY | Dehumidifying with light cooling |
| Sun | HEAT | Heating; in AUTO vane the louvre drops to a downward position (position 4 on EF) |
| Fan | FAN | Circulates air with no cooling or heating |
If the MODE button seems dead on an LN-series unit, the manual's answer is OPERATION LOCK, which must be switched off before the mode will change.
FAN speed, VANE and WIDE VANE
Three buttons control airflow. FAN sets the speed, VANE sets the up-and-down angle of the louvre, and WIDE VANE (AP and LN) sets left-and-right. Each cycles through a fixed sequence and each has a graphic on the display: rising bars for speed, small louvre-angle pictures for the vanes.
The FAN speed control button runs "in the following order: (Auto) (Quiet) (Low) (Med.) (High) (Super High)". The manual adds an audible cue: "two short beeps are heard from the indoor unit when set to AUTO".
VANE cycles "(Auto) (1) (2) (3) (4) (5) (Swing)". In AUTO the manual sets "cool/dry/fan mode: horizontal position; heat mode: downward". SWING means "the vane moves up and down intermittently". The warning, in the manual's words: "Always use the remote controller when changing the direction of airflow. Moving the horizontal vanes with your hands causes them to malfunction."
WIDE VANE has the same seven-step sequence for left-right airflow on AP and LN remotes. The EF series has no WIDE VANE button — its horizontal vanes are adjusted by hand — and neither does the GE VAD remote.
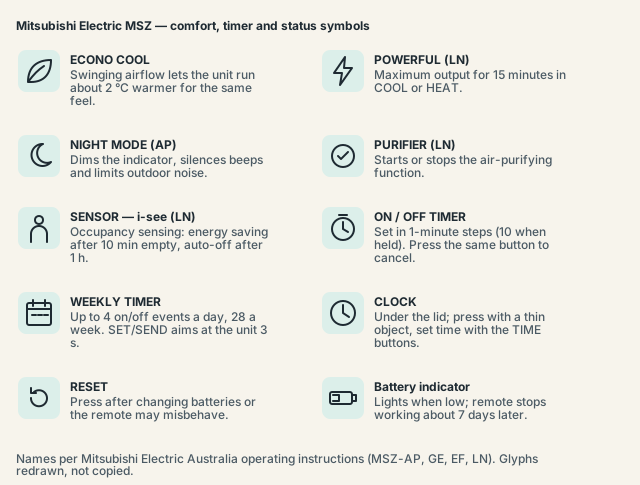
Comfort functions: i-save, ECONO COOL, POWERFUL, NIGHT MODE, PURIFIER and i-see
Not every MSZ remote carries all of these. i-save and ECONO COOL are on the standard AP, GE, EF and GL handsets; NIGHT MODE is on the AP remote; POWERFUL, PURIFIER and the i-see SENSOR button belong to the LN-series XG19 remote. The series letters on the indoor unit's label tell you which apply.
- i-save — "enables to recall the preferred (preset) setting" with a single press. It stores a setting each for COOL, HEAT and ECONO COOL.
- ECONO COOL — economical cooling with swinging airflow: "the set temperature and the airflow direction are automatically changed by the microprocessor to suit the climate. As a result, energy can be saved."
- POWERFUL (LN) — "maximum output for 15 minutes (COOL/HEAT only)".
- NIGHT MODE (AP) — "changes the brightness of the operation indicator, disables beep sound and limits noise" outdoors.
- PURIFIER (LN) — "activate/cancel air purifying operation".
- SENSOR / i-see (LN) — repeated presses step through "no occupancy energy-saving mode" after about 10 minutes without motion, then "no occupancy Auto-OFF mode" after about an hour, then cancel. With i-see on, the DIRECTION button offers INDIRECT, DIRECT, EVEN and OFF airflow.
The running cost calculator shows what a milder setting saves over a season.
Timers, CLOCK and DAY
The ON and OFF timers on an MSZ remote run on clock time, so the clock must be right first. CLOCK, DAY and RESET sit under a small lid on the handset, and the manual is specific about how to press them: "press CLOCK gently using a thin instrument".
Setting the clock (AP, EF and LN): press CLOCK, set the time with the TIME buttons — "each press increases/decreases the time by 1 minute (10 minutes when pressed longer)" — press DAY for the day of the week, then CLOCK again. The GE VAD remote has no DAY step.
- ON TIMER / OFF TIMER — press the ON or OFF timer button, set the time with the TIME buttons, and "press [ON/OFF timer button] again to cancel timer".
- WEEKLY TIMER — press WEEKLY TIMER to enter setting mode, choose the day and timer number (up to four ON/OFF timers per day, 28 per week), set on or off, the time and the temperature, then press SET/SEND while pointing the remote at the indoor unit for 3 seconds. Press WEEKLY TIMER on/off to activate (the day indicators light) and again to deactivate.
- CANCEL — clears a timer or a weekly setting while you are editing it.
RESET, batteries and pairing numbers 1–4
RESET is the button most owners never press and the one the manual insists on. Under the lid beside CLOCK, its instruction reads: "Press RESET gently using a thin instrument. If the RESET button is not pressed, the remote controller may not operate correctly." It "resets the remote controller settings" and clears timer data.
Batteries go in "negative pole first" — two AAA alkaline cells that last about a year. The manual rules out manganese, leaking and rechargeable batteries, and says to "replace all batteries with new ones of the same type". The battery replacement indicator "lights up when the battery is running low", and "in about 7 days after the indicator starts lights up, the remote controller stops working". Change them, press RESET, re-set the clock.
The small number 1–4 on the display is the remote controller pairing number. Up to four indoor units with wireless remotes can share a room; holding the pairing button for 2 seconds enters pairing mode so each remote drives its own unit. LN remotes also take an installation position setting (left, centre or right), entered by holding the up and down buttons for 2 seconds.
Problems the manual answers
Mitsubishi Electric's troubleshooting pages are short and mostly about the remote. The questions below are the ones the AP, EF, GE and LN manuals answer directly; anything they do not cover, including the "sun and snowflake" query, is noted rather than guessed at.
- No response, display blank or dim. The manual asks in order: "Are the batteries exhausted?" "Is the polarity (+, -) of the batteries correct?" "Did you press the reset button after replacing the batteries?" Then check the breaker is on and no "other appliance remotes" are being pressed nearby. For poor reception: "get close to the indoor unit and operate the remote controller."
- The wrong unit responds. Two units in one room are answering one remote; assign different pairing numbers.
- Unit started by itself after a blackout. The manual attributes this to the auto restart function, which is normal behaviour after a power cut.
- Mode will not change (LN). Switch off OPERATION LOCK.
- Remote lost or flat and you need cooling now. Press the E.O. SW (emergency operation switch) on the indoor unit: Emergency COOL, then Emergency HEAT, then stop, at a fixed 24 °C with medium fan and automatic vane.
- Sun and snowflake at once. No Mitsubishi Electric manual retrieved for this page describes such a display. The EF manual's button list does label the ECONO COOL key with a snow-and-sun style glyph, which may be what people are seeing.
- Lamp on the unit blinking. MSZ remotes carry no error-code readout. On AP, EF and GE a blinking operation indicator means "the room temperature is approaching the set temperature"; on a multi-system LN it means standby. Fault patterns are covered on the light blinking page.
The equivalent Daikin guide is Daikin remote symbols.
Frequently asked questions
Which remote model goes with my Mitsubishi Electric air conditioner?
Mitsubishi Electric Australia publishes a table: SG17B for MSZ-AP22–50, SG19C for AP15/20, SG18D for AP60–80, SG15D for GL25–60, KM09A or KM15K for GE22–50, SG11D for EF, and XG19D, E or F for the white, red and black LN.
What does the "A" on a Mitsubishi remote mean?
As the mode icon it means AUTO mode, where the unit picks cooling or heating for itself. On the fan-speed bars it means automatic fan speed, confirmed by two short beeps from the indoor unit. On the VANE graphic it means automatic louvre position: horizontal in COOL, DRY and FAN, downward in HEAT.
Why does my Mitsubishi remote show a battery symbol?
The battery replacement indicator "lights up when the battery is running low", and the remote stops working about seven days later. Fit two new AAA alkaline batteries negative end first, press RESET with a thin instrument, and re-set the clock and any timers.
Can I move the vanes by hand?
No. The manual is direct: "Moving the horizontal vanes with your hands causes them to malfunction." Use VANE and WIDE VANE on the remote. The one exception is the EF series, where the left-right vanes are adjusted by hand because that remote has no WIDE VANE button.
Sources and manuals checked
Button names, the MODE, FAN and VANE sequences, timer, clock, battery and RESET procedures and the troubleshooting answers are quoted from Mitsubishi Electric Australia's operating instructions for the MSZ-AP, LN, EF and GE series, and the remote-to-model table from its support page. The official symbols page is an image, so pictogram shapes follow the handset and two Australian installer guides rather than manufacturer text; the FAN position on the older GE remote was not confirmed.
- Mitsubishi Electric Australia — Remote control model numbers (official)
- Mitsubishi Electric Australia — Remote control symbols (official)
- Mitsubishi Electric Australia — MSZ-AP25/35/42/50VGD2 & VGKD2 Operating Instructions, VG79N348H02 (official)
- Mitsubishi Electric Australia — MSZ-LN25/35/50/60VG2 Operating Instructions, JG79Y724H01 (official)
- Mitsubishi Electric Australia — MSZ-EF22–50VG Operating Instructions, VG79Y155H01 (official)
- Mitsubishi Electric Australia — MSZ-GE22–50VAD Operating Instructions, JG79A796H04 (official)
- Mitsubishi Electric Australia — Blog: Master Your Air Conditioner's Remote (infographic based on MSZ-AP22–50) (official)
- Frozone Air — Mitsubishi Air Conditioner Symbols Explained (secondary)
- Airtech — Mitsubishi Remote Controller Functions (secondary)